
Font Effects
Specify the font effects that you want to use.
To access this command...
Choose Format - Character - Font Effects tab.
Choose View - Styles - open context menu of an entry and choose Modify/New - Font Effects tab.
Menu Format - Page - Header/Footer - Edit button (spreadsheets).
The changes are applied to the current selection, to the entire word that contains the cursor, or to the new text that you type.
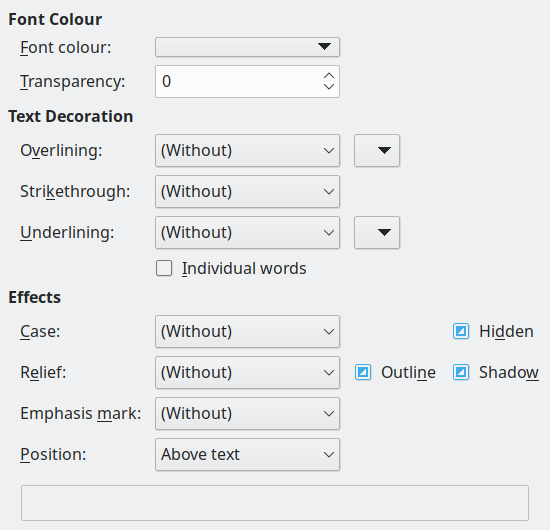
Font Colour
Sets the colour for the selected text. If you select Automatic, the text colour is set to black for light backgrounds and to white for dark backgrounds.
- To change the colour of a text selection, select the text that you want to change, and click the Font Colour icon. To apply a different colour, click the arrow next to the Font Colour icon, and then select the colour that you want to use.
- If you click the Font Colour icon before you select text, the paint can cursor will appear. To change the colour of text, select the text with the paint can cursor. To change the colour of a single word, double-click in a word. To apply a different colour, click the arrow next to the Font Colour icon, and then select the colour that you want to use.
- To undo the last change, right-click.
- To exit the paint can mode, click once, or press the Esc key.
The text colour is ignored when printing, if the Print text in black check box is selected in Office Writer - Print in the Options dialogue box.
The text colour is ignored on screen, if the Use automatic font colour for screen display check box is marked in Tools - Options - Office - Accessibility.
Transparency
Sets the transparency of the character text. The value 100% means entirely transparent, while 0% means not transparent at all.
Transparency cannot be set for Paragraph Style and Character Style.
Text Decoration
Overlining
Select the overlining style that you want to apply. To apply the overlining to words only, select the Individual Words box.
Overline colour
Select the colour for the overlining.
Strikethrough
Select a strikethrough style for the selected text.
If you save your document in Microsoft Word format, all of the strikethrough styles are converted to the single line style.
Underlining
Select the underlining style that you want to apply. To apply the underlining to words only, select the Individual Words box.
If you apply underlining to a superscript text, the underlining is raised to the level of the superscript. If the superscript is contained in a word with normal text, the underlining is not raised.
Icon on the Formatting Bar:
Underline
Underline colour
Select the colour for the underlining.
Individual words
Applies the selected effect only to words and ignores spaces.
Effects
Select the font effects that you want to apply.
Case
The following capitalisation effects are available:
-
Without - No effect is applied.
-
UPPERCASE - Changes the selected lower-case characters to upper-case characters.
-
lowercase - Changes the selected upper-case characters to lower-case characters.
-
Capitalise Every Word - Changes the first character of each selected word to an upper-case character.
-
Small capitals - Changes the selected lower-case characters to upper-case characters, and then reduces their size.
Hidden
Hides the selected characters. To display the hidden text, ensure that Formatting Marks is selected in the View menu. You can also choose Tools - Options - Office Writer - Formatting Aids and select Hidden characters.
Case
The following capitalisation effects are available:
-
Without - No effect is applied.
-
UPPERCASE - Changes the selected lower-case characters to upper-case characters.
-
lowercase - Changes the selected upper-case characters to lower-case characters.
-
Capitalise Every Word - Changes the first character of each selected word to an upper-case character.
-
Small capitals - Changes the selected lower-case characters to upper-case characters, and then reduces their size.
Relief
Select a relief effect to apply to the selected text. The embossed relief makes the characters appear as if they are raised above the page. The engraved relief makes the characters appear as if they are pressed into the page.
Outline
Displays the outline of the selected characters. This effect does not work with every font.
Shadow
Adds a shadow that casts below and to the right of the selected characters.
Asian Language Support
These commands can only be accessed after you enable support for Asian languages in Tools - Options - Language Settings - Languages.
Emphasis mark
Select a character to display over or below the entire length of the selected text.
Position
Specify where to display the emphasis marks.
Preview Field
Displays a preview of the current selection.
Reset
Resets changes made to the current tab to those applicable when this dialogue box was opened.
Apply
Applies the modified or selected values without closing the dialogue box.
This option appears only for Paragraph Style and Character Style.